Category Archives: Uncategorized

Puffy Painted Canvas

If you’ve spent any time at all on Pinterest lately, you’ve probably seen this pin floating around:

Super cool, right?  Since I’d seen it so often, I knew this was one I had to try for my blog.  So I clicked over to the blog from which this pin originated, Virginia & Charlie, for the tutorial.  If you’d like to check it out, head on over here: http://virginiaandcharlie.blogspot.com/2011/07/canvas-project.html.

Contrary to popular Pinterest belief, this project is NOT created by using glue on a canvas.  It is actually puffy paint.  So I did a brief read-through of the tutorial on the aforementioned blog, and I set out to Michael’s, a place where the choirs of angels all gather on their lunch breaks and days off.

I checked with the very friendly, helpful, kind and not at all rude sales girl (why hasn’t anyone invented a sarcasm font yet?) to make sure that even though the fabric paint I had selected did not actually say puffy paint, it would still have dimension when it dried.  I had chosen a 12-pack of paint and I was really committed to getting it because it came in pen form and I figured it would make this project easier.

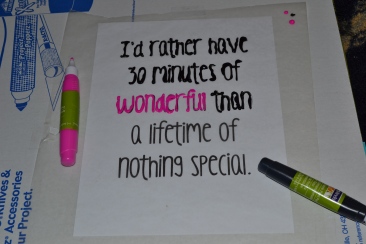
I had decided that I wanted to do a canvas with one of my favorite movie quotes on it for our front room or the stair case: “I would rather have 30 minutes of wonderful than a lifetime of nothing special.”  It’s from Steel Magnolias, which isn’t actually one of my favorite movies but I do like it and I love that quote.  As a backup, I decided to have a design on deck for Charlie with her name and a simple clip art graphic.

The Key Players: Art canvas (any size, whatever you want), fabric paint (must dry puffy/dimensional), mod podge, small bristled paint brush, wax paper (not parchment paper), your design, acrylic/spray paint for canvas (optional)

Ok, because the tutorial on Virginia & Charlie is really good (and much better than I could do), I’ll just give you the basic rundown.  You are supposed to print out your design, then lay it under the wax paper.  You trace your design with the puffy paint and let it dry completely, preferably overnight.  Then, you are supposed to peel the letters off the wax paper, apply mod podge to the back with your paint brush and attach the letters to the canvas.

So, I got really excited and just knew these would turn out great.  (Is it wrong to say you “just knew” something when whatever you “just knew” ended up being completely and utterly wrong?)

This is where I started:

Image

It may be kind of hard to tell (or maybe I’m just flattering myself), but those letters are super lumpy, wobbly, messy.  Ok the more I look at it, the more I realize I’m just flattering myself.  It’s not hard to tell.  Turns out, tracing does not come easily to me.  I had a really hard time keeping consistent pressure on the paint pen.  As I was tracing, my pressure seemed to inevitably wane and the paint would become more and more thin.  Then when I’d readjust my grip, the paint would come out in a big glob and I’d be left trying to spread it more evenly along the line of the letters.

Also, my hands are definitely not steady and I’m pretty sure steady hands would be an asset in this project.  But I was not to be deterred this easily.  I decided the problem was that it was just too many letters, so I’d switch to my Charlie design that had bigger letters and less of them.

Image

Not awesome, but slightly better.  It’s embarrassing to admit this, but between the first design and this one, it had already been about an hour and I was getting really tired.  I decided to call it a day, go to bed, and try again the next day.  For a little bit, I tried to convince myself that I was happy with the work I’d done on the second effort, but I knew I wasn’t and I had already had one foot in the “Maybe I’ll just throw in the towel on this one” camp.  I also knew that I really did not want to waste a perfectly good canvas on paint letters I was not happy with.

The next morning, I learned a lesson:

Don’t leave your painted designs on the floor to dry where the stupid dog can step in them.  When I came across this latest development, my other foot jumped quickly over to the “throw in the towel” camp and I just decided to call it quits on this one.  I didn’t have the desire or motivation to keep at this one as long as it would take me to come up with lines that were thick enough, smooth enough and straight enough to warrant being glued to a canvas and hung on a wall in my house.

As far as projects go, this actually is simple in that the steps you take are straight-forward and uncomplicated.  But I definitely think an artistic knack is required.  Or, you will have to be willing to go through lots of fabric paint to get satisfactory results.  I did peel off some of my letters afterward to see how easily they came off, and they peeled right off the wax paper.  So that part was not a problem.  Definitely the actual tracing is the hardest, most intricate step.

(One thing I did learn, which I guess I’ll have to consider the BFAT of this post, even though the A is clearly lacking: it seemed to go better when I kept the paint pen lifted slightly above the wax paper, making as little contact with the surface as possible.  The paint came out more smoothly this way, and if big globs came out I was able to manipulate them a bit better so that they didn’t look as globby when they came into contact with the paper.)

Easiness factor: For me, this one was obviously a 5 since I couldn’t even complete it.  But, if your hands are steadier than mine and you have more experience applying fabric paint, I’d call it a 3.

The First Tutorial: Paint Chip Gift Tags

My first project!  Yay yay yay.  May as well start off with an easy one, right?  So here we go.  Ladies and…probably just ladies (but if there are any gents, you are welcome too!) I give you: Paint Chip Gift Tags!

I saw these on Pinterest and was hoping for a tutorial (yes, that’s how unskilled I am – I wanted a tutorial for these easy as brownies tags), but when I clicked over, it turned out that someone on Etsy was actually selling them.  Sooooo in light of the fact that I don’t want my burgeoning blog to be shut down by a cease and desist letter from that lady’s lawyer, I won’t post a picture of her products or link to her store.  (Ordinarily, I plan to link to the original source to give the originator credit.  Is it bad that I’m starting off on this foot?)

The Key Players:


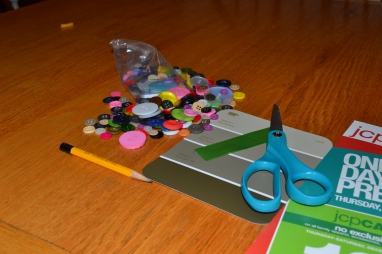
– Paint chips (the kind you can nonchalantly shove in your purse at Home Depot or even brazenly grab handfuls of while you pretend you are repainting an entire apartment building in every shade of every color)

– Ribbon

– Buttons

– Elmer’s glue (plus a paint brush to apply the glue)

– Scissors

– A ruler or straight edge of some sort

See that JCPenney coupon?  That’s my straight edge because I’m so novice I couldn’t even find a ruler.  I plan to purchase one soon, at which point I will be immediately upgraded to intermediate.  Also notice the leftover macaroni from my son’s dinner?  That’s what I get for trying to be artsy with my camera angle.

I didn’t put the glue in the picture above because I wanted to save my Big Fat Awesome Tip (BFAT…love how that worked out) for it’s own picture.  Hopefully I’ll come up with at least one BFAT for every post.  Sometimes they will probably be truly awesome, others they will probably only be awesome enough to make me feel good about myself.  Either way, BFAT they’ll be.

So, the BFAT.  I used to put glue on paper plates and use a paint brush.  That is awesome in itself because before I even did that, I used to just squirt glue directly from the bottle and ruin any and all projects I worked on.  Anyway, I’m being too chatty.  My BFAT is this:

Instead of using a paper plate, you can use a lid from a baby food jar!  That way you can just rinse it off when you’re done and use it again.  There you go, your BFAT of the post.  Hope you’re not too disappointed.

Onward.

Step 1:  Use your ruler to draw 2 diagonal lines on your paint chip, creating a pyramid/triangle shape.  If your button is small, you can make the top a more precise angle; if your button is large, you will want to leave it thicker to support the extra weight.

Step 2:  Cut the excess off the sides to leave just your tree shape.  Using either a second paint chip or one of the strips of excess you cut off, cut a small rectangle for the trunk.  Glue the trunk to the back of the tree.  (I thought I had taken pictures of this step but I don’t know what happened to them.  Hopefully it’s pretty self-explanatory.)

Step 3:  Take your selected button and apply a thin to medium layer of glue to the back.  You can also add a dab of glue to your tree if you want.  Stick your button onto your tree and press for a few seconds.  (In retrospect, it would probably be easier to do this step last but I’ve done it like this for all my tags and they turned out fine.)

Step 4:  Turn your tree over to apply your ribbon.  I used a shiny/satiny ribbon that was pretty thick, so I cut it in half hot dog style (aka length-wise).  Glue one end of the ribbon down to the top, making sure the shiny side is facing out towards the front of your tag.  Then bring the other end of the ribbon down and glue it down, creating a loop.

And there you have it!  You’re finished.  Super easy, super cute.  You could probably do all sorts of things with them.  Maybe make some sort of garland to string across your fireplace or a door.  I made some others and got even more ambitious by adding glitter.  In my mind, if you can use glitter on something, you should.

Easiness Factor: Without a doubt, 1

I’m feeling a little guilty by making my first post something so incredibly easy.  But don’t worry, things will start picking up around here and increasing in difficulty.  I’ve already got my second project in the works.  If you have some pins you’d like me to test drive for you, please email me!  I’m wide open to suggestions.  Hope to see you back here next time!

Welcome to my new blog!

Who you are:

You literally lose sleep because you can’t stop looking at Pinterest.
You repin DIY projects and recipes that a fellow pinner described as “simple” and then you go to try it and you realize that the person who said it was “simple” is likely a skilled photographer, artist or master chef.
You love being crafty and domestic, but you don’t have a lot of time and you can’t waste the time you do have on difficult, intricate projects that deliver lackluster results.
Who I am:
A 20-something wife and mother of two who is all of the above (aka just like you). I love crafts, doing projects with my kids, trying new recipes and just generally being creative. However, I don’t have what you might call a natural knack for these things.
I can’t draw.
I don’t knit.
I know only the one basic crochet stitch, and even then I don’t know how to add rows so the best I can do is knit the world’s longest ant scarf.
I’ve taken a few pottery classes in my time and the only reason I ever passed was either because I sucked up to the teacher or because it was pass/fail and I passed simply for showing up.
I can barely hammer a nail into a piece of wood, and my greatest construction triumph was putting together my son’s infant swing all by myself at 8 months pregnant when my husband was at work. (I always get SUPER excited when I can take an instruction manual from some piece of furniture, baby gear, etc. and successfully use it to get that item to look like the picture on the box.)
It typically takes me one to two tries (at best) with a recipe to get it remotely near what the originating chef intended.
I only recently discovered that, when you’re crafting, it’s way easier if you squirt Elmer’s glue onto a paper plate and use a paint brush to apply it to your project instead of putting it directly onto your project and ruining it by using either too much or too little.
Basically, I’m Crafting Level 0.
What this blog is:
This blog is a place for people who are like me (and even, if they can tolerate it, people with slightly or even significantly more natural talent than me) who are addicted to Pinterest and DIY projects. My mission is to take pins making the rounds on Pinterest and execute them. I will document their execution at various levels, then I’ll post the pictures and a commentary here. At the end, I’ll give each project a rating of simplicity on a scale of 1-5 (1 being my 2 year old could do it himself, 5 being it was so hard that I wanted to quit but didn’t because I had to blog about it). I will also post how long each project or recipe took me.
So how am I different from other blogs that posts tutorials and stuff like that? Well, I kind of already told you but if you’re going to ask again, it’s that I truly don’t have any real inborn talent for this kind of thing. The only thing I come by naturally is a sincere love for being creative and a sincere desire to be good at it. When you read my commentaries and see my pictures, the most common thought you’re likely to have is, “Aw that’s so cute, her toddler must have helped.” or, “Aw, well, A+ for effort anyway!”
When you read my posts, you will know that I am giving you the point of view and opinion of someone who is truly a beginner in almost every way. My hope is that it will inspire and encourage you to try new projects and recipes with a clear idea of what you’re getting into!
If you have recently pinned anything that you are hesitant to try or are just curious about, email me and let me know! I’d be happy to look at it and see if I can give it the old college try. I’m not working with an unlimited (or even large) budget, but I do have the will to create so we’ll see how this goes! Hopefully if I can stick with this blog, my husband will let me get a custom template designed. Think of the possibilities!
Pinning Addicts Unite!